jQuery-ui horizontal menu made easy

This is some code for building a jquery ui horizontal menu. It is based on code by https://codepen.io/seungjaeryanlee/ and modified for icon support and to create a menu automatically from a JSON schema. It’s pretty useful for HTML5 app development.
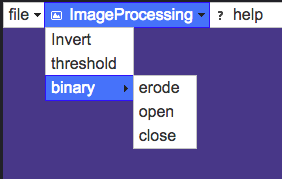
menu created from JSON
Menu created from JSON schema

HTML

This is how the menu would look be structured if just coded in html

<ul id="menubar">
  <li><div class="icon"><span class="ui-icon ui-icon-folder-open"></span><a href="#">Alpha</a></div>
     <ul>
      <li><div><a href="#">Beta 1</a></div></li>
      <li>
        <div class="icon"><span class="ui-icon ui-icon-folder-open"></span><a href="#">Beta 2</a></div>
        <ul>
          <li><div class="icon"><span class="ui-icon ui-icon-folder-open"></span><a href="#">Beta 2a</a></div></li>
          <li><div><a href="#">Beta 2b</a></div></li>
        </ul>
      </li>
      <li><div><a href="#">Beta 3</a></div></li>
    </ul>
  </li>
  <li>
    <div><a href="#">Beta</a></div>
    <ul>
      <li><div><a href="#">Beta 1</a></div></li>
      <li>
        <div><a href="#">Beta 2</a></div>
        <ul>
          <li><div><a href="#">Beta 2a</a></div></li>
          <li><div><a href="#">Beta 2b</a></div></li>
        </ul>
      </li>
      <li><div><a href="#">Beta 3</a></div></li>
    </ul>
  </li>
  <li><div><a href="#">Gamma</a></div></li>
  <li><div><a href="#">Delta</a></div></li>
 </ul>

javascript

menuStructure is the JSON menu descriptor, the code setUpMenuHTML and addMenuHTML create HTML from this schema in the format of the html above.

var menuStructure = {menu: [
                        { name: "file",  
                          menu: [
                              {name: "Open", icon: "ui-icon ui-icon-folder-open"}, 
                              {name: "save", icon: "ui-icon ui-icon-disk"}
                          ]
                         },
                        {name: "ImageProcessing", icon: "ui-icon ui-icon-image",
                         menu: [
                             {name: "Invert"}, 
                             {name: "threshold"}, 
                             {name: "binary", 
                              menu: [
                                    {name: "erode"}, 
                                    {name: "open"}, 
                                    {name: "close"}
                                    ]
                             }
                            ]
                        },
                        {name: "help", icon: "ui-icon ui-icon-help"}
                    ]};
    

function addMenuHTML(ME, $selector)
{
    var $ulOuter = $selector;
    
    if(!$selector.is('#menubar'))
        $ulOuter = $("
    ").appendTo($selector); for(var j=0;j").appendTo($ulOuter); if(ME.menu[j].icon) { str = '
    '+ME.menu[j].name+'
    '; } else{ str = '
    ' + ME.menu[j].name + '
    '; } $(str).appendTo($liInner); // call recursively on nested menu elements if(ME.menu[j].menu) addMenuHTML(ME.menu[j], $liInner); } } function setUpMenuHTML() { var $menu = $('#menubar'); $menu.empty(); addMenuHTML(menuStructure, $menu); } function setUpMenu() { $('#menubar').menu(); $('#menubar').menu({ position: { my: 'left top', at: 'left bottom' }, blur: function() { $(this).menu('option', 'position', { my: 'left top', at: 'left bottom' }); }, focus: function(e, ui) { if ($('#menubar').get(0) !== $(ui).get(0).item.parent().get(0)) { $(this).menu('option', 'position', { my: 'left top', at: 'right top' }); } }, }); } $(document).ready(function() { setUpMenuHTML(); setUpMenu(); });

    css

    the CSS ensures that the menuu is horizonal and that the icons are correctly displayed next to the menu names and that the sub menus also indent correctly

    #menubar {
      position: fixed;
      top: 0;
      left: 0;
      width: 100%;
    }
    
    ul > li a{
      max-width:100%;
      color: inherit; /* blue colors for links too */
      text-decoration: inherit; /* no underline */
    }
    
    li > div {
      white-space: nowrap;
      overflow: hidden;
    }
    
    /* Make jQuery UI Menu into a horizontal menubar with vertical dropdown */
    #menubar > li { /* Menubar buttons */
      #text-align: center;
      display: inline-block;
    }
    
    #menubar li > div:not(.icon) {
      padding-left: 0.3em !important;
    }
    
    #menubar li > div.icon {
      padding-left: 1.5em;
    }
    
    #menubar > li > ul > li { /* Menubar buttons inside dropdown */
      display: block;
    }
    
    /* Change dropdown carets to correct direction */
    #menubar > li > div > span.ui-icon-caret-1-e {
      /* Caret on menubar */
      background:url(https://www.drupal.org/files/issues/ui-icons-222222-256x240.png) no-repeat -64px -16px !important;
    }
    #menubar ul li div span.ui-icon-caret-1-e {
      /* Caret on dropdowns */
      background:url(https://www.drupal.org/files/issues/ui-icons-222222-256x240.png) no-repeat -32px -16px !important;
    }

    Responsive social sharing toolbar

    The social tool bar featured on this site came from this excellent blog post. I really liked the social bar so I added it to the ejectamenta site. I have created some files to make it easy to install (click the links to download) responsive-share-bar.js and responsive-share-bar.css , and some 32×32 pixel image icons shareicons.zip. Save these files somewhere on your webserver and remember the path. Add this code in the head section of you

    <link rel="stylesheet" type="text/css" href="http://www.yourwebsitename.com/path/to/file/responsive-share-bar.css"/>

    Then add the reference to the javascript file just before the tag.

    <script async type="text/javascript" src=""http://www.yourwebsitename.com/path/to/file/responsive-share-bar.js"></script>

    Then copy the following html code to the body section of your webpage

    <div id="share-wrapper">
        <ul class="share-inner-wrp">
            <!-- Facebook -->
            <li class="facebook button-wrap"><a href="#">Facebook</a></li>
            
            <!-- Twitter -->
            <li class="twitter button-wrap"><a href="#">Tweet</a></li>
            
            <!-- linkedin -->
    		<li class="linkedin button-wrap"><a href="#">Linkedin</a></li>
            
            <!-- reddit -->
    		<li class="reddit button-wrap"><a href="#">Reddit</a></li>
       
            <!-- Digg -->
            <li class="digg button-wrap"><a href="#">Digg it</a></li>
            
            <!-- Stumbleupon -->
            <li class="stumbleupon button-wrap"><a href="#">Stumbleupon</a></li>
          
             <!-- Delicious -->
            <li class="delicious button-wrap"><a href="#">Delicious</a></li>
            
            <!-- Google -->
            <li class="google button-wrap"><a href="#">Google+</a></li>
            
            <!-- Email -->
            <li class="email button-wrap"><a href="#">Email</a></li>
        </ul>
    </div>

    For the linkedin summary field I get this from the meta-description tag on the page, so your page should have something like the following on it. If it is longer than 256 chars, linkedin say that they will truncate the string and use ellipses.

    <meta name='description' content='How to install a responsive toolbar for your website that works well on desktop and mobile websites'>

    That’s it, you should now have a good looking, slide out, and responsive social toolbar for your website, just like you see on the left of this page, please share if you like my site.

    All The code was webpage formatted using the CodeToHTML converter

    Code2HTML web tool

    Code2HTML is a webtool that allows you to convert computer code into a form suitable for webpages. Its a basic cut and paste job. It also colour convert /* */ style comments and encloses with “pre” and “code” html tags for correct displaying. Here you can see an example of converted php/smarty code .

    Vocabulist: bookmarklet to help with learning languages

    If you want to learn a language it is a good idea to start reading a book in your preferred foreign language, reaching for the dictionary for any unknown words. This way you will increase your grammar and vocabulary in a natural manner whilst getting the hand of colloquial expressions. However reaching for the dictionary and searching for words is time consuming and gets in the way of reading the text. The vocabulist bookmarket found on the Ejectamenta website lets you have instant translations merely by hovering over unknown words. This works for just about any website (except those using iframes, like ebay!). The software tool optionally speaks the translated words as well. Just drag the bookmarklet to your browser bookmarklet bar to get started, then click on the bookmark button to activate the tool, next find a book (for instance an online Spanish version of Don Quixote) and start reading in your new language.