Getting started building an extension with the Firefox CFX program
Introduction to browser extensions
Browser extensions are programs that run on a browser for instance Firefox and interact with the content of web pages. Firefox provides an addon SDK and the CFX command line tool for developing extensions which we will discuss later. An extension generally consists of the 3 main source files.
- Addon File: This JavaScript file (main.js) controls communication between the other files and allows interaction with the functionality of the addon API.
- Panel File: This file displays a form to the user to input information or settings it is typically displayed by clicking an icon in the browser toolbar, JavaScript handles getting/setting data from the controls and relaying this data to the addon file.
- Background or Content Script File: This runs in the context of the webpage that a user is browsing and allows the extension to read and write to the webpage and change the browsing experience for the user. For instance the content scipt file could analyse website page structure and provide SEO feedback to the user.
There is also a JSON file called package.json that defines the extension settings.
The extension that will be developed
The extension that we will develop is called jspanel. It consists of a addon file that controls the addon logic (main.js) and a background or content script file (content.js). The extension will also have a popup panel (panel.js and panel.html) in which you enter some javascript code to run in the content of the web page. The content file attaches this code to the webpage when a the panel’s ‘Run Code’ button is clicked. The script will saved to persistant storage using addon SDK functionality. Messages will be passed between the addon and the panel and the addon and the content script. The extension uses the Page Worker method, so that the extension code it will automatically run for each opened browser tab although the running of the content script code is controlled by clicking a button on the panel.
Downloading and installing the addon SDK and the CFX tool
The addon SDK can be obtained from the Mozilla website. You will also need python to run the SDK tools, this can be easily installed using by doing
apt-get install python2.7
on Linux. On Windows you can download either just install Python or Anaconda, a complete Scientific Python development environment. In Windows to run python on the command line in different directories you will have to add the path to the Python executable in the PATH option of the environment-settings dialog. Download and extract the compressed SDK file and cd to the new folder. The SDK can started by running the command source bin/activate. However you probably don’t want to always have to navigate to this directory to run the command, I set up an alias to run the SDK from any directory
alias addon='cd ~/Downloads/addon-sdk-1.17/;source bin/activate;cfx;cd -'
After running this command the command prompt changes to include (addon-sdk-1.17) and you have access to the CFX tool. With the CFX tool you can create a new bare project in an empty directory by running cfx init and load and run the extension in the browser by running the command cfx run in the extension directory. The cfx xpi command is used to generate the installable .xpi file from the extension folder.
The cfx init command produces an empty project, if you run the empty project with cfx run you won’t be able to see icons or panels to interact with, however it does provide a package.json which you can modify with information on your extension. You can also add extra fields to the json file, for instance if you need to make cross domain calls you can add a ‘permissions’ setting.
permissions": { "cross-domain-content": ["http://www.CrossDomainURL1.com/*", "http://www.CrossDomainURL2.com/*"]}
Example extensions can be found in the addon directory and demonstrate more functionality, for instance, if you cfx run in the ‘addon-sdk-1.17/examples/reddit-panel’ directory you will see that the reddit-panel extension has an icon on the browser bar and that if you click it a panel pops up pre-populated with reddit posts.
Debugging Extensions with Firefox Nightly
It’s only possible to debug extensions in Firefox versions later than 37, on Linux it is likely that you have an older version of the browser (I am on v36) so I installed Firefox Nightly for debugging purposes. It’s also able to debug HTML5 elements such as Canvas and WebAudio as well as experimental support for multi-threading so it’s well worth installing. Update: Now my Linux PC is on Firefox v37 and can debug extensions, the browser is much more stable than nightly so I recommend sticking with the normal install. You can install the browser using the following commands
sudo add-apt-repository ppa:ubuntu-mozilla-daily/ppa;
sudo apt-get update;
sudo apt-get install firefox-trunk;
Once its installed you’ll want to setup a profile so that the browser will remember your settings between restarts, for instance you can always start on the same web page that you use for testing. This can be done by running the command
firefox-trunk -P night
A dialog pops up and you can create a new profile (called for instance night). To start up Firefox using the profile you need the path of the profile directory. On my Linux computer it was found at ~/.mozilla/firefox-trunk/6z43qrwk.night/. I also create an alias to run the extension using firefox nightly under the profile directory and save the alias statment by adding to the ~/.bashrc file.
alias nightly='cfx run --binary=/usr/bin/firefox-trunk --profiledir ~/.mozilla/firefox-trunk/6z43qrwk.night/'
Now when Firefox nightly is run in the extension directory it starts up with the same settings as before and now allows you to debug your extension. You can start the debugger by clicking the Tools->Web Developer->Browser Toolbox menu item. In Windows its easier to go to the about:addons page (extensions tab) and click on the debug button of your extension (this way probably works for Linux too). A dialog pops up which states:
An incoming request to permit remote debugging connection was detected. A remote client can take complete control over your browser!

Client Endpoint: 127.0.0.1:57362
Server Endpoint: 127.0.0.1:6080

Allow connection?
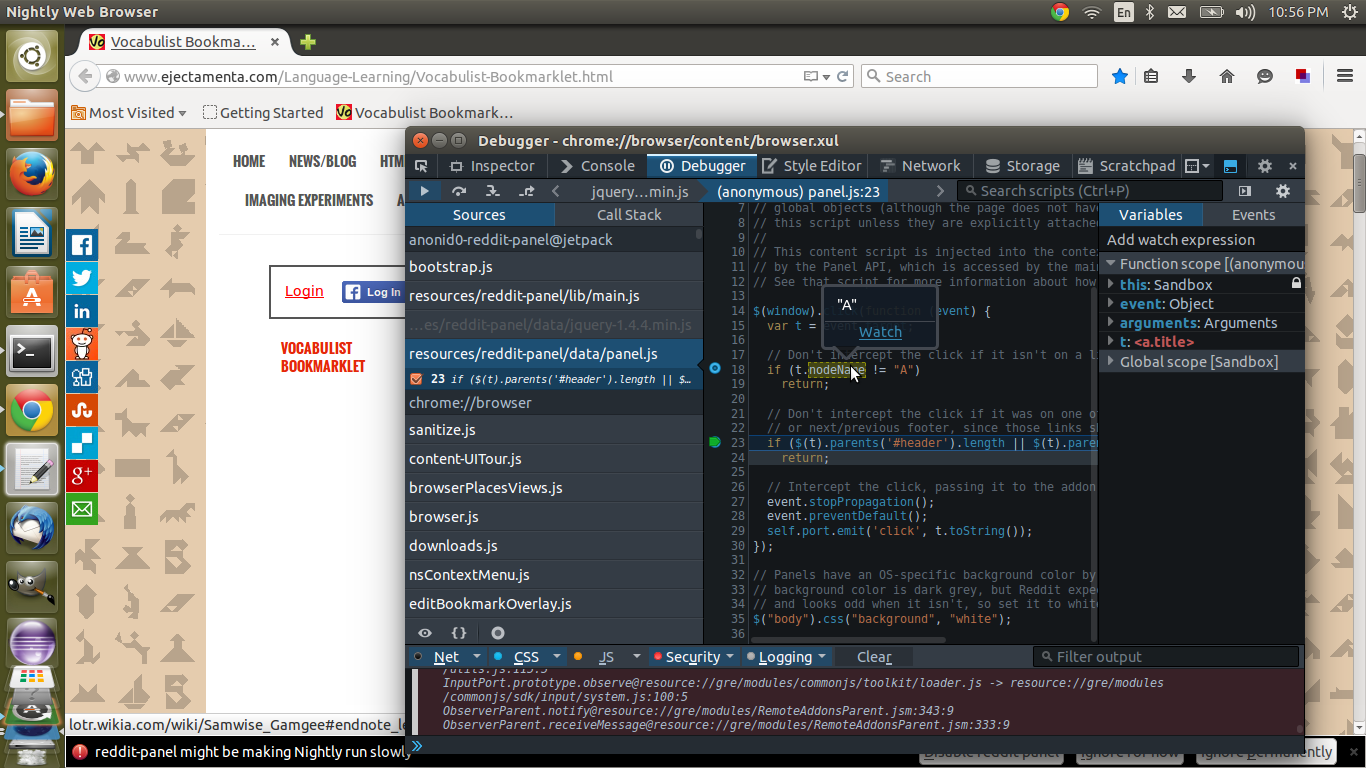
When you click YES you will see the debugger window. The window contains a console window where you can see any coding errors and most importantly a debugger tab, on the left hand side there is a sources tab visible. There are a lot of files listed most of which are the Firefox SDK files, however if you look carefully you will be able to find the extension source code files which are normally somewhere towards the top of the list (under the path resources/your-extension-name). When you click on your source file you can click to the left of the line number and set a breakpoint on which execution will halt. The following image shows debugging of the reddit-panel extension with the debugger stopped at line number 23 and a variable value being watched in a popup.
Coding the extension
The package.json file
First we will create a new directory with the name of your extension (I called it jspanel) and run cfx init in it. You can open up the package.json file in the root folder with text editor and personalise the extension by changing some of the settings for instance like author and description. Here is the altered package.json file for the extension.
{
  "name": "jspanel",
  "title": "jspanel",
  "id": "jid1-gBrsZGUZBimfBw",
  "description": "Run any code in the context of a webpage",
  "author": "ejectamenta",
  "license": "MPL 2.0",
  "version": "0.1"
}
The panel html code (panel.html)
Our html file contains a textarea html5 editbox and a button that runs our code.
<title>Enter javascript in the edit box</title>
</head>
<body>
<textarea cols="25" rows="7" id="code" style="width:100%"></textarea>
<button id="run">Run Javascript</button>
 </body>
The panel JavaScript code (panel.js)
The panel JavaScript file handles the html control events, the code is run when the dialog ShowDlg event is sent from the addon, just before the panel is shown. The document.getElementById('run').onclick function is called when the ‘Run Code’ button is clicked, it sends a ‘Run’ message to the addon (main.js) using the self.port.emit method along with the script (from the text edit box) that we want to run on the web page. The user’s JavaScript code will will be serialised to storage so that edited code is not lost between sessions, this is handled by sending a message to the addon when a keyup event happens in the edit box (only the addon code is allowed access to the addon SDK storage class).
<span style="color: green;">/*
	Get the source code text from storage via the addon add to textarea control
*/</span>
self.port.on("load-script", function(val) {
	document.getElementById('code').value = val;
});

<span style="color: green;">/*
	On Run button click send the script text to the addon
*/</span>
self.port.on("showDlg", function(val) {		<span style="color: green;">/* called when popup shown */</span>

 	<span style="color: green;">/* on button click handler */</span>
	document.getElementById('run').onclick = function(){
		var script = document.getElementById('code').value;
		self.port.emit("Run", script);
	};

	<span style="color: green;">/* update storage when script text changes */</span>
	document.getElementById('code').onkeyup = function(){
		self.port.emit("store-script", this.value);
	};
});
The addon code (main.js)
When building the addon we can choose whether to have page workers for every newly opened page or just for the active page. The first example creates workers for every new tab using a page mod object. The second example source code uses the tabs class to add a worker to the active tab only when the ‘Run Code’ button is clicked
The page-mod class – workers for every page
The file main.js is located in the lib directory and contains the main extension logic, it will create the class to handle the panel and the content script and also act as an intermediate for the passing of messages between the panel and the addon script. The worker array contains workers for each of the opened web pages (i.e. each tab). Workers are attached and detached when pages are loaded or closed.
We have a toggle button with a set of icons (these can be found in the zip file). The onChange function of the toggle button shows our panel with the position of button meaning that it is shown next to the extension button.
Our panel class object uses the contentURL property to define the html file and the contentScriptFile property to define the JavaScript file for the panel. To specify a CSS file for the panel the contentStyleFile property can be used in exactly the same way as the contentScriptFile property. The handleHide function closes the panel and panel.on("show") function allows use to do something before the panel is shown. In our case we read the script text from storage then call panel.port.emit("showDlg").
The pageMod class object loads up jquery and our content script file and runs the contentScript when ‘ready’. The ‘*’ in the include: ['*'] parameter specifies that the worker will run on any domain, this can be changed to specific domains in which case the worker will only load on those domains. The ‘Run’ command from the panel is received in the panel.port.on("Run") event function, we then send a message to the content script that includes the script text using the worker.port.emit('Run') call. On getting the panel.port.on("load-script") call from the panel we save the code text to storage.
/* content script reference allows modification to webpage content */
var pageMods = require("sdk/page-mod");
/* used to load files */
var data = require("sdk/self").data;
/* local storage class */
var ss = require('sdk/simple-storage');

var workerarray = [];

/* worker for each open tab */
function detachWorker(worker, workerArray) {
  var index = workerArray.indexOf(worker);
  if(index != -1) {
    workerArray.splice(index, 1);
  }
}

exports.main = function() {

	/* toggle button reference */
	var { ToggleButton } = require('sdk/ui/button/toggle');

	/* panel class */
	var panel = require("sdk/panel").Panel({
		height: 330,
		contentURL: data.url("panel.html"),
		contentScriptFile: data.url("panel.js"),
		onHide: handleHide
	});

	/* Create a button */
	var button = ToggleButton({
	  id: "show-settings",
	  label: "Vocabulist Settings",
	  icon: {
		"16": "./icon-16.png",
		"32": "./icon-32.png",
		"64": "./icon-64.png"
	  },
	  onChange: handleChange
	});

	/* Show the panel when the user clicks the button. */
	function handleChange(state) {
	  if (state.checked) {
		panel.show({
		  position: button
		});
	  }
	}

	/* hide panel */
	function handleHide() {
		/* hide the popup panel */
	  	button.state('window', {checked: false});
	}

	/* function called when panel showed */
	panel.on("show", function() {
		/* read from storage set control settings */
		if(ss.storage["script-source"] !== undefined)
			panel.port.emit("load-script", ss.storage["script-source"])	/* send data to panel */

		/* show the popup panel */
		panel.port.emit("showDlg");
	});

	var pageMod = pageMods.PageMod({
		include: ['*'],
		contentScriptWhen: 'ready',
		contentScriptFile:
		[data.url("jquery.min.js"),	data.url("content.js")],
		onAttach: function(worker) {

			/* add tab to array of workers */
			workerarray.push(worker);

			worker.on('detach', function () {
				detachWorker(this, workerarray);
			});

			/*
			you can use worker.port.on to receive messages from
			content script in a similar way to panel.port.on
			*/

			panel.port.on("Run", function(val) {
			  	worker.port.emit('Run', val);
			});

			panel.port.on("store-script", function(val) {
				ss.storage["script-source"]=val;
			});
		}
	});
}
The tabs class – a worker for the active tab
If we don’t want our code to run on every tab then we can make use of the tabs class. When the ‘Run’ function is called a new worker is created from the currently active tab and attaches the specified content scripts to the source code of only that tab. The following code can be used alternatively to the main.js and is included in the panel-tab zip file and the project available in the firefox addons gallery.
/* content script reference allows modification to webpage content */
var tabs = require("sdk/tabs");
var self = require("sdk/self");

/* used to load files */
var data = self.data;
/* local storage class */
var ss = require('sdk/simple-storage');

var _jquery = false;

exports.main = function() {

	/* toggle button reference */
	var { ToggleButton } = require('sdk/ui/button/toggle');

	/* panel class */
	var panel = require("sdk/panel").Panel({
		height: 330,
		contentURL: data.url("panel.html"),
		contentScriptFile: data.url("panel.js"),
		contentScriptWhen: "start",
		onHide: handleHide
	});

	/* Create a button */
	var button = ToggleButton({
	  id: "show-settings",
	  label: "Vocabulist Settings",
	  icon: {
		"16": "./icon-16.png",
		"32": "./icon-32.png",
		"64": "./icon-64.png"
	  },
	  onChange: handleChange
	});

	/* Show the panel when the user clicks the button. */
	function handleChange(state) {
	  if (state.checked) {
		panel.show({
		  position: button
		});
	  }
	}

	/* hide panel */
	function handleHide() {
		/* hide the popup panel */
	  	button.state('window', {checked: false});
	}

	/* function called when panel showed */
	panel.on("show", function() {
		/* read from storage set control settings */
		if(ss.storage["script-source"] !== undefined)
			panel.port.emit("load-script", ss.storage["script-source"]);	/* send data to panel */

		/* show the popup panel */
		panel.port.emit("showDlg");
	});

	/* save script to storage */
	panel.port.on("store-script", function(val) {
		ss.storage["script-source"]=val;
	});

	/* attach script when Run Code clicked */
	panel.port.on("Run", function(val) {
		var worker = tabs.activeTab.attach({contentScriptFile: [self.data.url("jquery.min.js"), self.data.url("content.js")]});

		worker.port.emit('Run', val);
	});
};
The content script code (content.js)
The content script file is simple and just handles the worker.port.emit('Run') command from the addon in the self.port.on("Run") function. JQuery is used to add the code script to the html document body of the browser DOM.
self.port.on("Run", function(val) {
	/* attach source to content page */
	$( val ).appendTo( "body" );
});
Running the extension
In the panel the following javascript code is added wrapped in the html script tags (html code can also be included in the editbox). The code is run using cfx run in the extension directory.
<script>
alert("Hello World!");
</script>
Here is an example of the jspanel extension running in Firefox Nightly on Windows, it shows the result of clicking on the ‘Run Code’ button. 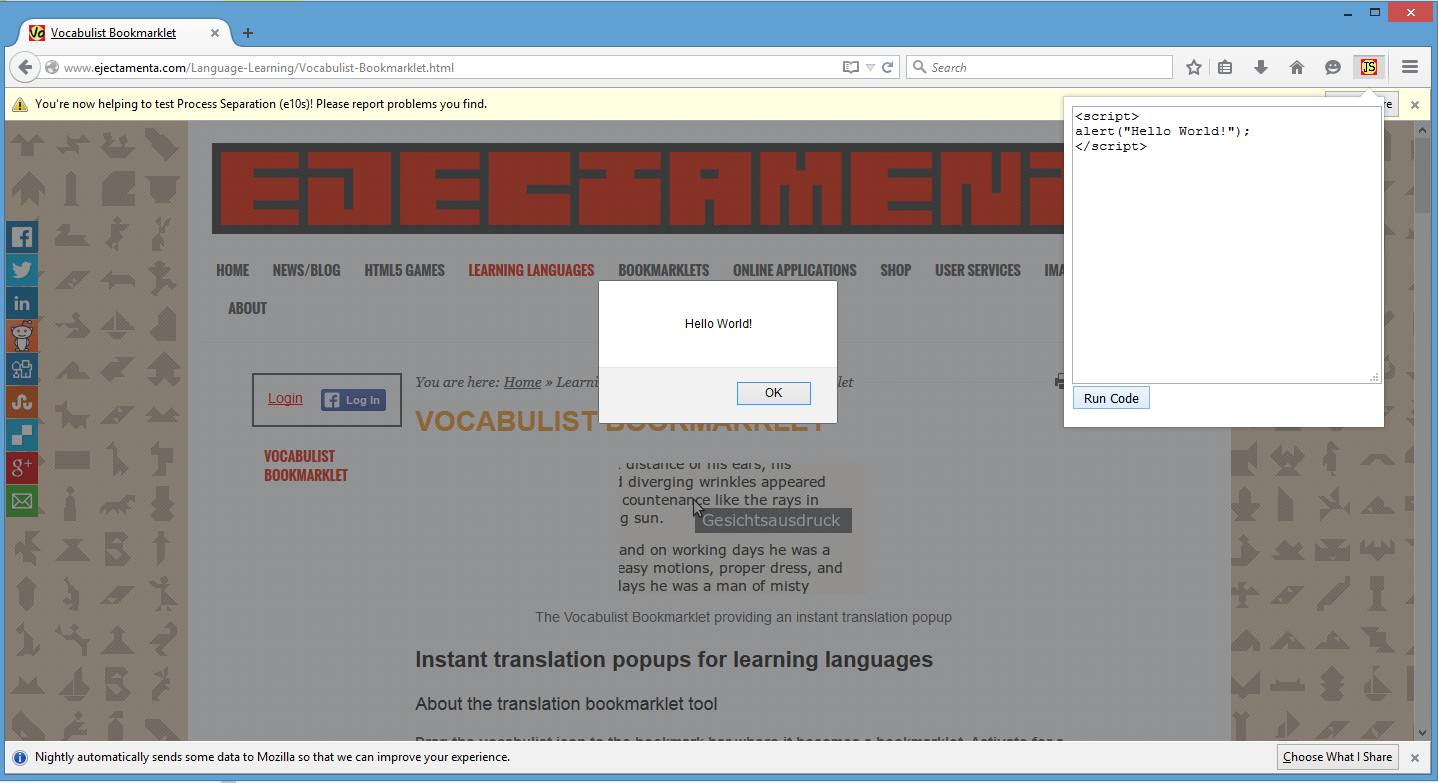
The complete source for the page mod project can be downloaded here and for the tabs project here. To run this code as an extension just rename the zip file giving it a xpi file extension (jspanel.xpi). This also means that you can rename any extension .xpi file to .zip and extract and read the extension’s source code.
Please link to this web page if you find the tutorial useful.
The html and JavaScript code has been formatted for the webpage using the Code2HTML online code to web page formatting tool.


