User tangram puzzles can now be saved and viewed in the user home page area.
The user home page is a place where you can view all your completed puzzles. The tangram puzzle now has the ability to create your own tangram puzzles using unlimited amounts of the 7 tangram building block pieces.
To do this just click on the user tangram button in the top right corner of the
MegaTangram screen and start building your tangram design. To save your user tangram click the button again. The new puzzle will be added to the user home page and also shown in the completed puzzle area on the top of the puzzle screen.
Construct your own tangram picture using as many shapes as needed
By clicking on the user tangram button a tangram picture can be designed. As many shapes as needed can be dragged from the bottom of the screen into the puzzle area to use making a pattern or picture. Zoom in and out and move the canvas around to give yourself more space in which to build. User tangrams can be seen on the user home page as well as in the MegaTangram game
If you install the URL Shortening Bookmarklet, getting a shortened URL for a webpage is easy. When you are on the page you want to link just click the bookmarklet and the shortened URL is returned, copy and paste it anywhere.
Vocabulist bookmarklet working in the default Android web browser
To install bookmarklets on an android device the best way to do this is using the browser sync function. So add the Vocabulist bookmarklet to your web browser on the desktop (chrome/firefox recommended) in the normal way. Then, in the case of chrome, when you log on to google with your username all your bookmarks along with any bookmarklets are available (still not sure how to make the bookmark bar appear though). Since there is no mouse hover on tablets and smartphones you have to click on the word to get the popup. Here are some example images
The ejectamenta texture maker software lets you create a repeating pattern from a single image. This is useful to create wallpaper or as a texture to be mapped to surfaces or just to create interesting patterns.
To create a repeating pattern the edges of the image have to be similar to each other, for instance the top edge should mirror the bottom edge and likewise for the left and right edges. The corners need to mirror all the other corners. We talk as the image to be repeated being the unit cell, in our case we are doing a 2D translation of the image to form the pattern.
You can design a pattern so that the pattern at the edges is continuous from bottom to top and the whole pattern then appears as a completely unified design. You can for instance leave the edge of the images blank and just have the design in the center of the unit cell, but this doesn’t make a very interesting pattern! It is better to draw parts of the design beyond the boundaries of the image and mapping these parts back to the unit cell (providing there is empty space at the other edge).
This software attempts to make a pattern from an arbitrary image by mixing or blending the pixel information at the edge of the images (you can choose how much of the edge is to be blended) from left to right and top to bottom. Its a simple algorithm that can only really work with semi-random textures, however it is still possible to create some interesting patterns. Once the texture image has been made it can be repeated in a grid pattern to see how good the texture looks. If you right click on the pattern you can save the image to disk.
Of course it is a pretty basic technique but useful for random textures. I will update it at a later date to use a wavelet pyramid technique and include it in the image processing application I am working on.
here is an example of an image and the repeated pattern it has been blended using 15% of the image edge.
How mortgages or loans companies make money from you
The reason for this article is that in the past (whilst living in the UK) I have moved location and bought another house somewhere else like many people do. The mortgage company or bank said that they must cancel the mortgage and take out a new mortgage on the new house. It surprised me how little money I received back from the bank for the old mortgage for all those months that I had paid X hundreds of pounds paying back the mortgage (excluding the additional penalties for early termination!). So this article is going to look at the mortgage payments and give a few plots to illustrate what happens with your money.
In our mortgage example we are going to borrow 140,000 pounds at an interest of 6.5% annually for a term lasting 30 years. The main calculation will be how much of the principal (amount borrowed is paid back every month). For this we will use the annuity formula, where `r` is the monthly interest rate expressed as a decimal (`r`=yearly_rate/12/100), `P` is the principal or the amount borrowed and `N` the number of months in the full term.
`c=(r*P)/((1-(1+r)^-N))`
Using this formula we can calculate our monthly payment (c=885 pounds). The other formula we need is for the debt schedule which tells us how much of the principal gets paid off every month which we will term `p`.
`p=((1+r)*P’)-c`
Where `P’` is the previous months outstanding amount (`p`) which at the beginning of the term will be equal to `P` (More information on the formulas used can be found here).
I have generated a few plots from the formulas given above to try to demonstrate what happens to your money when you pay back a mortgage or loan. For example the plot of `p` vs `N` below shows a typical repayment curve for the borrowed money
How the capital amount owed decreases with time
You can see in this figure that the amount of the capital that you pay back in the beginning years is not much with most of the money being spent paying back the interest. This means that if you move early on in the term you wont get much money back from the mortgage, therefore it is better if possible to hang in there until the full term has ended.
The next figure shows the proportions of the monthly mortgage payment split between capital and interest payments as the mortgage progresses. It actually takes 19 years 4 months before capital payments are greater than the interest payments in a 30 year mortgage.
Proportions of monthly mortgage payment that goes towards paying capital vs interest payments
The final figure shows just how much extra money is made from lending the money and which proportion of this is interest or capital repayment. You actually pay more money towards interest than you do towards capital and the total money spent during the mortgage term is more than double the money borrowed.
Total Amount of money paid during lifetime of mortgage
I have a nikon D300 that I want to use as a slide/film copier, I did buy a set of novoflex bellows for this purpose but its quite fussy on the lenses it accepts, i could only get it to fit a Series E 50mm or a Soligor 60-300mm macro (which happens to be a cool lens BTW).
For my copier I am using a Nikon 55mm f/2.8 AF MICRO-NIKKOR lens with a 62mm filter thread. For the slide copying attachment I found a ES-E28 side copying part that was originally make for a Nikon Coolpix camera. it has quite a number of nice accesories like a film and a slide holder, it ia also well made with a good quality diffusor glass. The slide copier head can be taken apart by removing the grub screws, you remove the Coolpix attachment part and just use the head section.
To adapt the ES-E28 to the nikon camera I used a Filter-Adapter 62mm for a Nikon CoolPix L840, part number LA-62L840T. The larger end of this part fitted the E28 section quite well and could be attached using the grub screws. On the other end of this adapter is a female 62mm thread so then I just needed a 62mm to 62mm adpater ring to attaach it to my macro lens (other apater rings can be bought for other lens sizes). The filter adapter consists of two parts, on part that attaches to the ES-E28 and a 38mm long (excluding threads) tube with 62mm female-male threads on it. This tube can be replaced by a longer or shorter one to adjust the focal distance for different lenses. You can also source one with male-male threads and do away with the adapter ring (if you happen to have a 55 F/2.8 AF lens like me, otherwise you still need an adapter to fit whatever size of filter thread the lens you are using has).
All the components described in this article when used with a APS format DSLR perfectly spaces a slide from the lens so that it fills the image frame. If you have a different focal length lens or different sensor size (FX) then you will need to source an appropriate 62mm spacer tube (eg longer for longer focal length on DX). For example If you have the 40mm Micro lens on a DX then the Filter adapter is probably too long and the image of the slide will not fully fit the frame, in this case you will need a shorter 62mm tube, (I think probably a 20mm length tube would be about right giving the working distance of 35mm from lens to subject). On my setup the slide distance is 75mm from the front of the lens. KenRockwell says that the working distance is 55mm from the front of the lens so maybe then the slide is a actually a bit smaller than the frame (but as it is now it is leaves a bit of room for error and still has plenty of pixels).
Some comments on taking the pictures:
Use manual focus, with auto focus the lens will hunt and with this extra weight on the end that is not good for the camera. Use live view and zoom to manually focus on the slide/negative (you would probably be better off with the manual focus AI 55mm lens insead of the AF version I have). Set the camera to manual settings, adjust the aperature to a smallish f-stop, like f-8, this gives the sharpest images. In live view mode you can also see the exposure meter, adjust the shutter speed so that the meter reads 0, neither dark or light. For each slide/negative you do you will can adjust this to compensate for poor exposure in the orginal image, or just leave it as it is. You will probably find you dont have to refocus (if you are gentle changing the slides/negatives), but results will be better if you do.
I ran though about 100 slides in about an hour, its pretty quick, the slowest part is replacing the slides in the changer (you also have to watch that they are aligned horizontally when inserted into the tube).
Here are some images of the setup taking a picture of a slide with an image of some apples on it.
Update
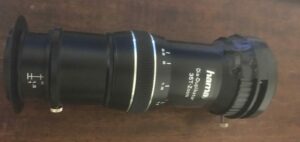
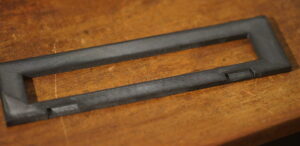
I now use a Hama Dia Duplikator 35T-Zoom to scan my analogue films. It is a better solution than the Coolpix copier mentioned above. This time I am using it with a full-frame Sony Camera. For this Duplikator I have designed for 3D printing a film holder that works quite well. It can be found here .
The Music of the Chemical Spheres webpage has been redesigned and now has audio from 40 molecules. The improved interface enables the sounds to be heard by clicking on keyboard like buttons or using keys on the keyboard. Matlab Octave source code is given.
I modified a mplayer linux script to play all bbc radio stations. It can be found here . If you call it without a number then it will output the station and its number, otherwise call it like this